

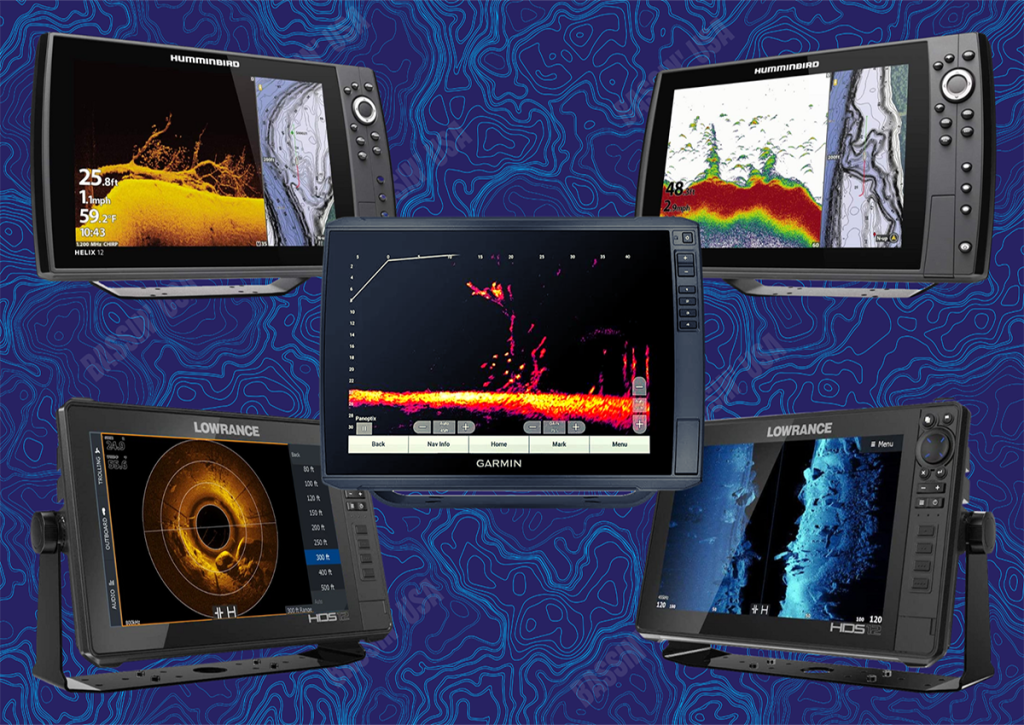
Basic settings for performance – Humminbird 1198 – 1197 – 998 – 997SI and 797SI
First, the Side Imaging does not even compare to the 2D versions of the Lowrance units or even any other units. On the 997SI and the 797 SI units, there are few things you need to look at. With SI units we are looking to the side and these settings are totally different, but here is what we are going to look at on these units.
Sensitivity
Side Imaging Views and Distances
Color of the display
Side Imaging units are very simple once you get used to it, but everyone has a lot of trouble understanding what they are seeing and that makes it very disappointing for some. After you teach yourself what you are seeing the rest just falls into place with a little trial and error.
Still the best way I have found to read these guys is by experience and practice, or even better you can post your pictures on BASSIN USA’s Facebook Page, or even the SI Sites like the Facebook Side Imaging Group on Yahoo, and have other guys look them over just to verify what you are seeing. More you can find like trees, brush piles, or dock cables the better you will get with these units. Start small by looking for structure you already know is there, Play with it and then play with it some more!!!
Here are the best settings changes or adjustments that I learned that have really helped me out with these units.
Sensitivity’s Settings
Sensitivity settings are from 1 – 20 on your unit. The best way to explain how this works is this, for harder bottoms or harder objects sensitivity needs to be lower, for rock bottoms I will start at 10 and move down, the factory setting is 10, which is the best place to start.
Find an item like a tree or a brush pile, pause your SI screen then go to your sensitivity button move the Sensitivity up and down till you find the best looking picture with the most detail then move on and find more structure to see how it will really stand out since you made your changes. The majority of the items I have found are made of a hard material, like wood, metal, rock and so on, so this setting will give you the most payback.
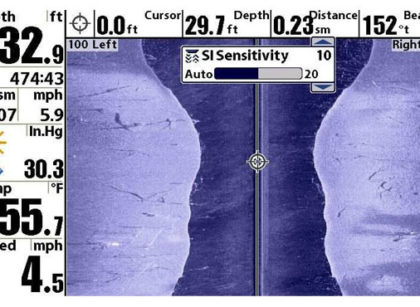
For softer bottoms like sand or mud, the sensitivity needs to go the other way or higher like above 10, then you can find items like sandbars, or even brim beds in the sand or soft bottom. Here are some great pictures which a good friend of mine has put together just for this, this is a picture of a roadbed on the left side of the screen, with the highest sensitivity you can not see the old roadbed which is a hard compound, but lower you set sensitivity the better the picture gets.. (By the way, Doug Vahrenberg is the designer of the Yahoo Side Imaging Groups website and is also the author of these great pictures for us.)
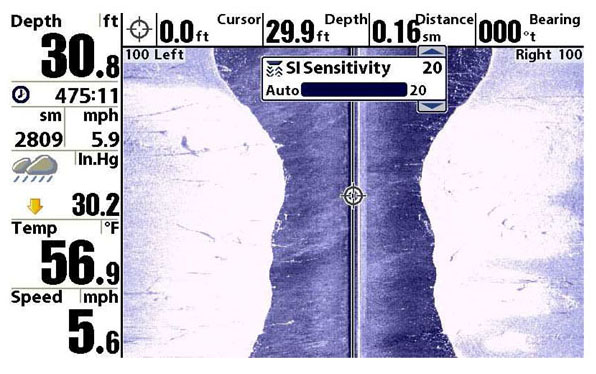
This is with the Sensitivity up to the max at 20 nothing on the left or right can be seen and everything with a hard return is all white. Basically, the hard returns are overpowering everything.
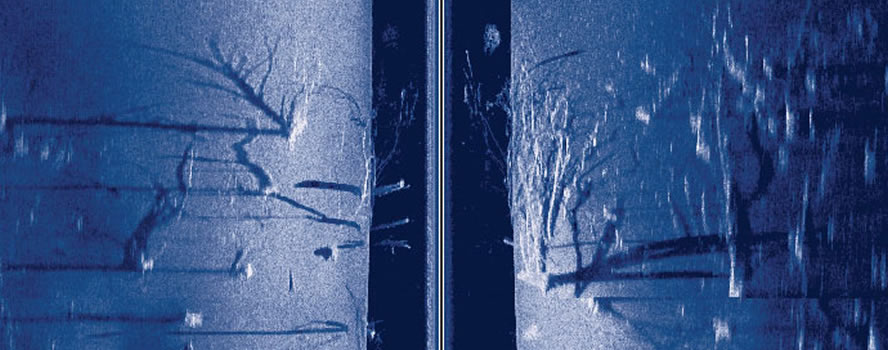
Now here is the same picture with the sensitivity set at 10 notice the old roadbed on the left bottom that is more than likely silted over so only a small part is shown and also notice that all of the white is gone with a lot more detail of the trees on both sides even with the shadows of the trees. Harder the bottom lower the sensitivity = better picture.
Now just go the other way with softer bottoms like sand or mud higher sensitivity = better picture, the more you will see.
Now go play with the sensitivity on your unit experiment with it and hopefully this will help you understand how the sensitivity works with the SI unit this will make objects better to see and pick out once again go out and play with it.
SideImaging Views and distance left and right
On your SI unit you can choose a left side view only, a right side view only or both sides at once. The best way to get started is to view both sides at once until you get used to what you are seeing. Then after you have figured out what you are seeing you can choose left or right to really get good details.

Left Side
Both Side at the same time (Best to start with) Notice the large group of shad in the black areas of the picture where the cursor is placed, that black area is just about right under the boat but a little off to the left side, also notice those little white dots in the black area off from the shad, those are your fish.

Here is my favorite configuration this picture shows the Right and Left Side view and with the 2D view also, this is a large group of trees and mixed in with them are some shad and fish as seen on the SI picture. I have marked the shad and the fish but if you look good you can see the tops of the trees and the fish right in them. The shad are the larger blobs and the fish are the smaller white dots close by. Notice on the 2D version picking out the fish is almost impossible, but look good on the SI version the fish really stand out. I would go back and fish the tops of these trees really good.
SideImaging Distance on (Left, Right or Both) sides of the Boat
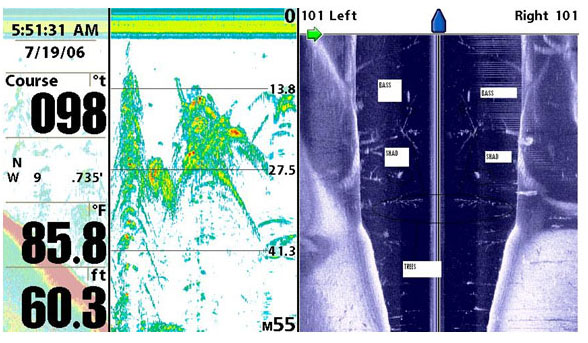
On your side imaging unit, you can choose how far your unit can see and display information on the left, right or both sides of the boat. By changing the distance your unit can display you will change the amount of information displayed if you look at the above picture in the upper right and left-hand corners of the SI display you will see left 100 and right 100, this tells us how far the unit is looking to the sides. Also, notice that there are a lot more black area and a lot less bottom on each side, I’m driving right over the tops of these trees.
The closer the distance to the side of your boat in which your unit is looking the smaller and harder it will be to pick out items, the farther away they are the easier they are to see and pick out a lot more details. If you set this too close you will miss a lot of items. The default is 100 feet. I try to keep mine around 100 – 125 feet. The best picture to understand this is the above-left side only picture, notice this one is set at 78 feet. You see a lot of the point on the left side of the screen, but in the darker or deep water, you see the boat outline on the lower right side of the picture. Notice how close the boat is to being right under the boat, the more you extend out the side view in feet the more definition you will get and the more you will see under the boat also. I would have gone by this again but set my left side over 115 – 125 and we would have gotten a more detailed look at the boat on the bottom.
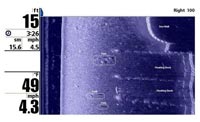
With these pictures I have my graph set to only 26 feet notice how hard it is to see the fish hanging on the bridge pillar. Everything looks fuzzy and you really have to look to see the shad and bass.

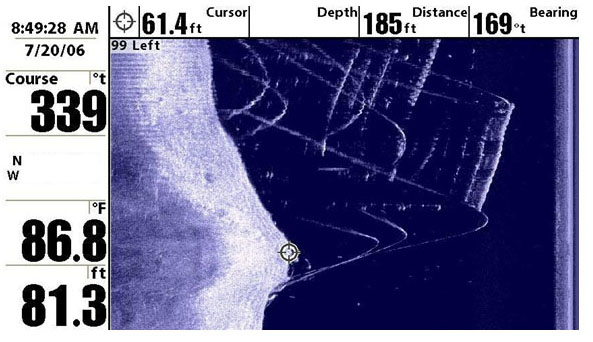
Now with this picture we are looking at a deep water dock on a point. Notice that I have my unit set to 99 feet on the left, not only can we see the dock but everything under it and all the way to the bank. By the way, those bent looking lines are your dock cables and all of these white dots around them, those are your fish.
Side Imaging Screen Colors
The SI Units has the ability to change the colors of the screen from Brown to Blue, Green and a few other colors, the best I can tell you is Blue, but everyone has there own colors that they can work with, that is something you must just try all colors and see what works for you best.
Work with these setting to get the most out of your unit and just keep working with it, the more you find the more you will understand, then start fishing it and watch your catch ratio go up!
In my next article, I will get some more pictures and post them then I will try to explain what we are seeing on the Unit, like shad schools, schools of fish, large trees, ditches, roadbeds, bridges, docks and much more. Like I say hope it helps and you can understand my writing. Any questions just drop me a post or an email and we can discuss.
Good Fishing Everyone.
Capt. Don